
Create Your Own Kontakt Libraries

Skill Level: Moderate
This article will discuss the process of creating a digital sample based library for musical applications. Topics such as recording, microphone placement, and mixing will be addressed; as well as elements of design in Adobe Photoshop, and computer scripting in the language of the computer program Komplete 5 by Native Instruments.
Programs Needed
A Digital Audio Workstation (DAW) of your choice
Full Version of Kontakt
Adobe Photoshop (or similar)
MIDI Keyboard Controller
Here we go:
I will detail the process in which I achieved success in this project. By following these instructions, you can create your own sample-based virtual instrument in Kontakt 5. There are four steps: recording, mixing, scripting, and UI design.
Step 1: Recording
To record the samples for my crotale library, I borrowed the school’s set of crotales and set up my laptop with an audio interface in the Performing Arts Center Pavilion. I was fortunate to acquire time in that space because of the positive acoustical qualities the room possesses, as well as a large selection of microphones.
I used seven microphones to record the crotales and placed them all around the room to capture different aspects of the sound as it reverberated through the space. The three microphones closest to the crotales were a stereo pair of Sennheiser MKH 40-P48 condenser microphones. This was the best sounding placement and ended up being 90% of the sound of the final product. On the other hand, the RCA 77-DX Ribbon microphone had a cool vintage sound, but it was not the proper microphone for this application; it was not used in the final mix at all. The four AKG 414s were placed around the room to capture the natural ambience of the room. They only account for about 10% of the final mix because, unfortunately, there was a piece of machinery built into the PAC that was malfunctioning and making a consistent squeaking noise. To turn up the ambient microphones further would capture the unwanted noise pollution.

Fig. 1 - A diagram of my setup.
When recording, I meticulously recorded audio samples of the crotales, an instrument with 25 individual pitches. In order to get the expression needed to achieve the realism of a human performance, each pitch needed to have separate recordings of its different dynamic levels. For this project, there was no need to record more than three different dynamic levels for each pitch class because of the consistency in timbre across its dynamic range. However, for instruments with a greater variance in timbre, more recordings might be needed for each note being sampled to adequately represent the instrument’s sonic variance at different dynamic levels. I repeated the above process for different selections of mallets and playing styles including soft mallets, hard plastic mallets, and bowed technique.
STEP 2: MIXING
After all the audio samples were captured, I edited the raw recordings. Any mistakes made during the recording session were deleted. I also added a low cut EQ at 40hz as well as a 1-decibel boost around 10khz to cut out rumble and add shimmer to the recording. I also added a compressor set to a high threshold to subdue only the loudest notes. I used EQ and compression because I feel that it refined the sound in a positive way—purists would prefer that the audio samples were left untampered. While mixing, I also took this as an opportunity to organize my audio files into their appropriate groups. This was important because Kontakt prefers that samples be organized by dynamic, and within each dynamic group, by pitch class. See photo.

Fig. 2 - All the samples arranged in chromatic order, organized by dynamic.
In the crotale library, the samples performed with hard plastic mallets have three groups, piano, mezzo, and forte, and within those dynamic groups, all twenty-five recorded pitches are arranged chromatically in ascending order. Again, this is the preferred format for audio before it is imported into the program. To complete this step in the process, each dynamic grouping of audio must be printed (or bounced) into one audio file containing each pitch sample. To avoid a degradation of quality, I used WAV format at a sample rate of 48k Hz, and a bit depth of 24 bits.
Step 3: Scripting
Once the audio files were bounced, I imported them into Kontakt and began to script the virtual instrument interface. The process went like this: to create a new Kontakt instrument, either double click in the blank instruments area, or click “Files,” then “New instrument.” Once the instrument is created, I named it and clicked on the wrench icon in the top left hand corner. This revealed the Instrument Edit Mode for Kontakt.

Fig. 3 - Kontakt 5 menu. Creating a new Kontakt instrument.

Fig. 4 - This is what you get when you create a new instrument.
I clicked on the “Mapping Editor” tab and then dragged in the audio files for the sample library. Then I used the “Wave Editor” and activated the grid to adjust the start and end time of each sample within the one file. When finished, I clicked and dragged the “Drag Midi to Host” button from the “Sync Slice” tab into the mapping editor.

Fig. 5 - Kontakt 5 Wave Editor.
This process, and much more can be referenced in the Kontakt 5 users manual.
At this point, the samples should be playing when triggered by information.
At this point, the next thing I did was design the user interface. I first did this by writing a script to code for all the knobs and buttons that control the parameters of this instrument. It took me a few tries to write a successful script free of errors, but after some practice I got the hang of it. Kontakt uses its own scripting language so all of the commands were provided in the Kontakt users manual. Here is the script used in this project:
CODE
on init
set_script_title("Crotales Main")
make_perfview
set_ui_height (6)
message ("Cinematic Orchestral Crotales")
{---This is where creation begins}
declare ui_knob $knob1 (0,1000000,1)
move_control ($knob1, 4,4)
set_text ($knob1, "PreDelay")
declare ui_knob $knob2 (0,450000,1)
move_control ($knob2, 5,4)
set_text ($knob2, "Low Cut")
declare ui_knob $knob3 (397000,1000000,1)
move_control ($knob3, 6,4)
set_text ($knob3, " Reverb")
declare ui_knob $knob4 (397000,1000000,1)
move_control ($knob4, 6,7)
set_text ($knob4, " Volume")
declare ui_button $button1
move_control ($button1, 6,2)
set_text ($button1, " Reverb Bypass")
{---Making knobs work with FX}
{---Giving the knobs a set label}
set_knob_label($knob1,_get_engine_par_disp($ENGINE_PAR_IRC_PREDELAY,-1,0,1))
set_knob_label($knob2,_get_engine_par_disp($ENGINE_PAR_CUTOFF,-1,1,1))
set_knob_label($knob3,_get_engine_par_disp($ENGINE_PAR_SEND_EFFECT_OUTPUT_GAIN,-1,0,1))
set_knob_label($knob4,_get_engine_par_disp($ENGINE_PAR_SEND_EFFECT_DRY_LEVEL,-1,0,1))
end on
{---Getting the label to show the change in display/getting them to actually work}
on ui_control ($knob1)
_set_engine_par($ENGINE_PAR_IRC_PREDELAY,$knob1, -1,0,1)
set_knob_label($knob1,_get_engine_par_disp($ENGINE_PAR_IRC_PREDELAY, -1,0,1))
end on
on ui_control ($knob2)
_set_engine_par($ENGINE_PAR_CUTOFF,$knob2, -1,1,1)
set_knob_label($knob2,_get_engine_par_disp($ENGINE_PAR_CUTOFF, -1,1,1))
end on
on ui_control ($knob3)
_set_engine_par($ENGINE_PAR_SEND_EFFECT_OUTPUT_GAIN,$knob3, -1,0,1)
set_knob_label($knob3,_get_engine_par_disp($ENGINE_PAR_SEND_EFFECT_OUTPUT_GAIN,-1,0,1))
end on
on ui_control($knob4)
set_engine_par($ENGINE_PAR_SEND_EFFECT_DRY_LEVEL,$knob4,-1,0,1)
set_knob_label($knob4,get_engine_par_disp($ENGINE_PAR_SEND_EFFECT_DRY_LEVEL,-1,0,1))
end on
on ui_control($button1)
if ($button1=1) set_text($button1," Reverb On")
set_engine_par($ENGINE_PAR_EFFECT_BYPASS,0,-1,0,1)
else
set_engine_par($ENGINE_PAR_EFFECT_BYPASS,1,-1,0,1)
set_text($button1," Reverb Off")
end if
end on
In this script, knobs are created and then linked to effects modules within Kontakt such as Reverb and EQ. Every Kontakt instrument requires a unique script that will fulfill its exact needs so the above script is meant to be simply a reference tool in the creation of similar instruments.
Step 4: Design
Lastly, to transform the user interface from the plain grey default into a captivating, imaged based design, I used image-editing software such as Photoshop to create such an image. If you don’t have Photoshop, check out this post covering how I made a Kontakt Library Background with completely FREE online tools! The process I went through to create this background was to first screen capture the instrument interface that I had created thus far and import that image into Photoshop. Then, once in Photoshop, I used the screen shot as a template for me to create an image the exact dimensions of the Kontakt instrument. I was able to work around the knobs and buttons, creating a custom look. The beginning screenshot looked like this:
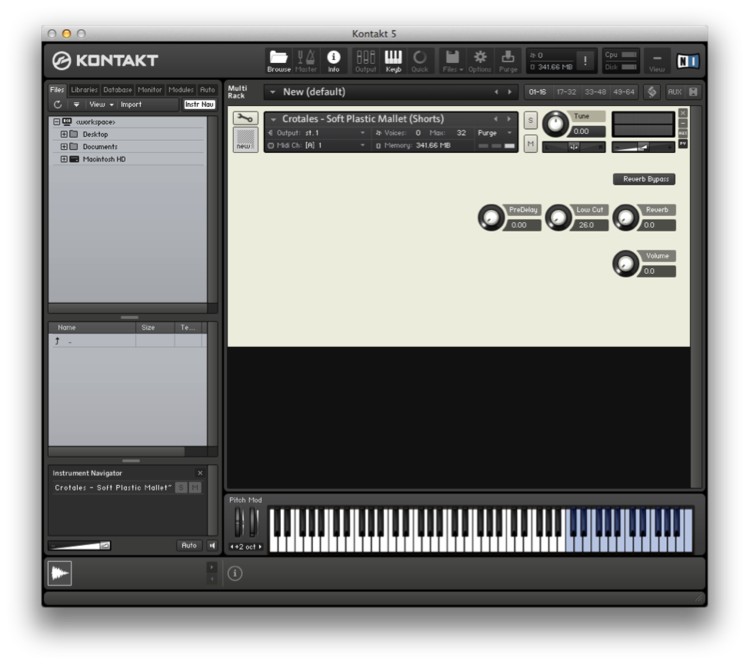
Fig. 6 - Knobs and buttons are coded in. Still missing aesthetic touches.
When creating my background image, I based the design heavily off of a photo that I had taken of the instrument. Once I was finished, I imported the image into Kontakt and set it as my custom wallpaper. To do this, I clicked the “Instrument Options” button on the top left and then clicked the browse button next to “Instrument Wallpaper” to navigate to my image. Once the image was selected it became the background for the instrument and replaced the plain default background as seen in the example below.

Fig. 7 - Wallpaper is set, this is the final look of the Library.
In order to use this virtual instrument in a musical application, it should be opened as a plugin within a Digital Audio Workstation (DAW) such as Pro Tools. Using MIDI information, one can record and playback the MIDI notes as a composition. This project points to the future of digital music composition for film and television. Anyone who aspires to compose for today’s digital media should follow the instructions in this article and dive into the next generation of music making.